Work in Progress - still in Draft - untested
pictures
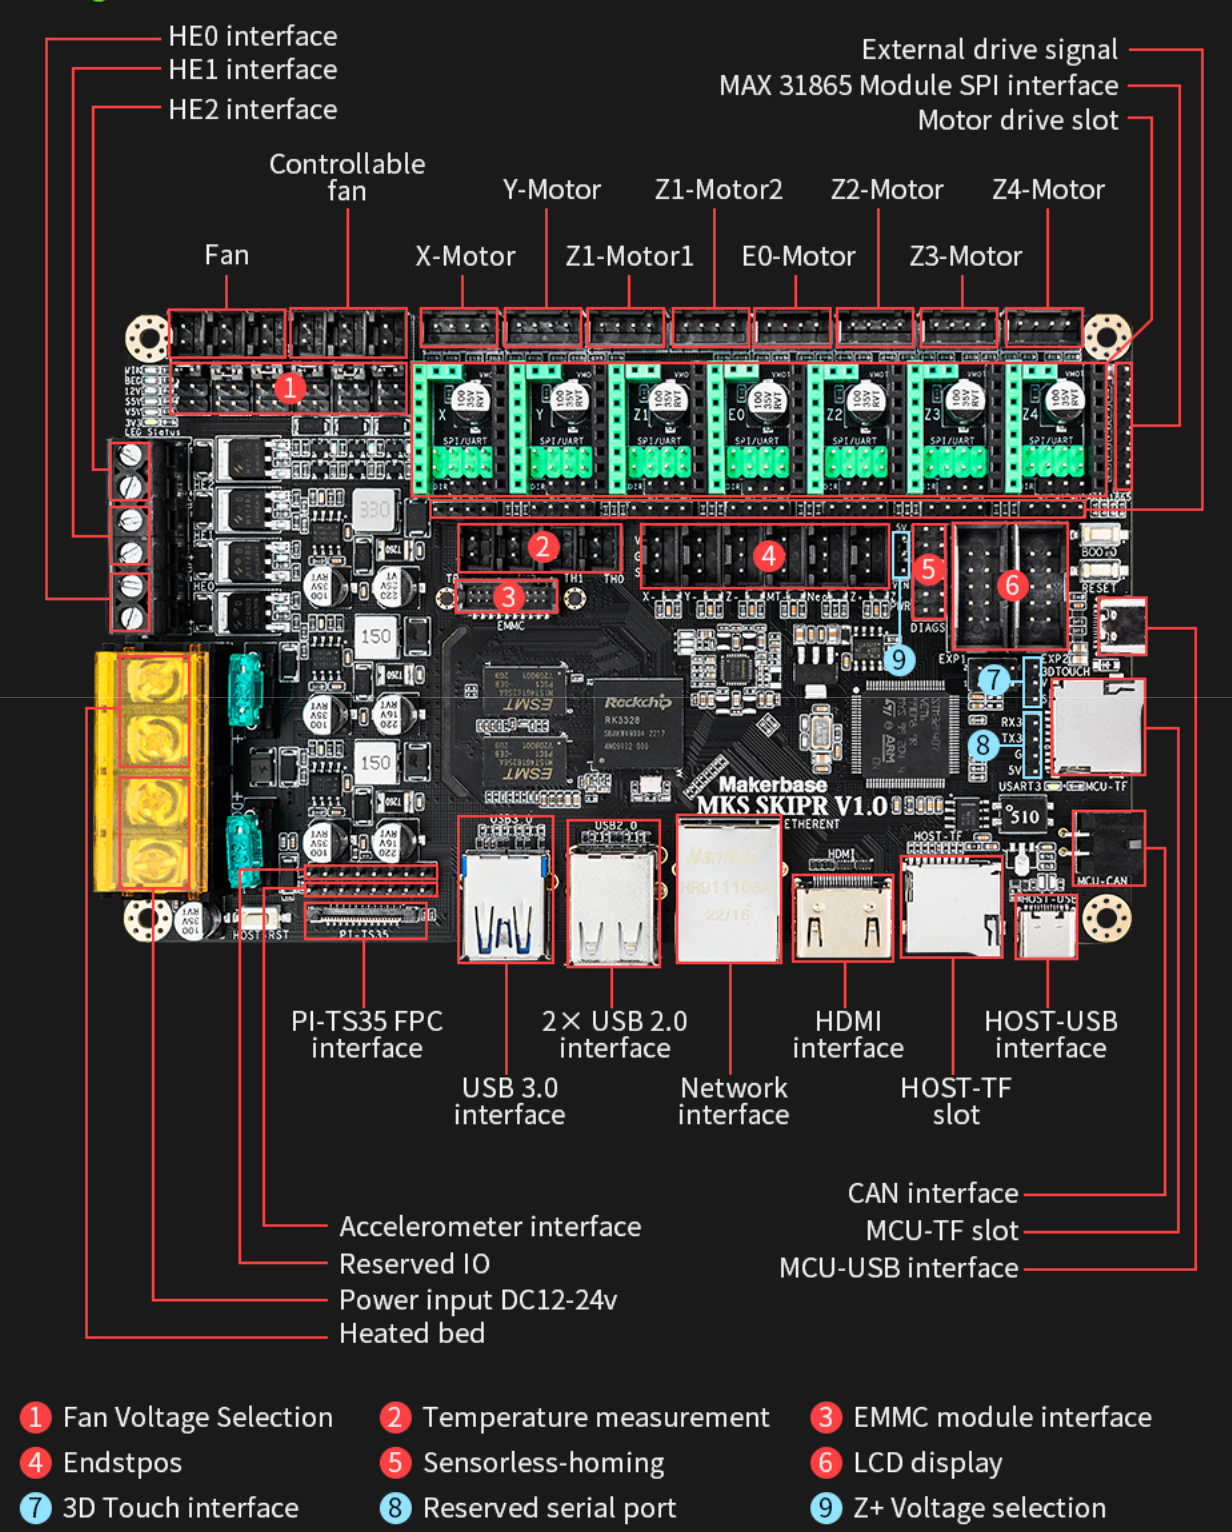
- connection overview (MKS)
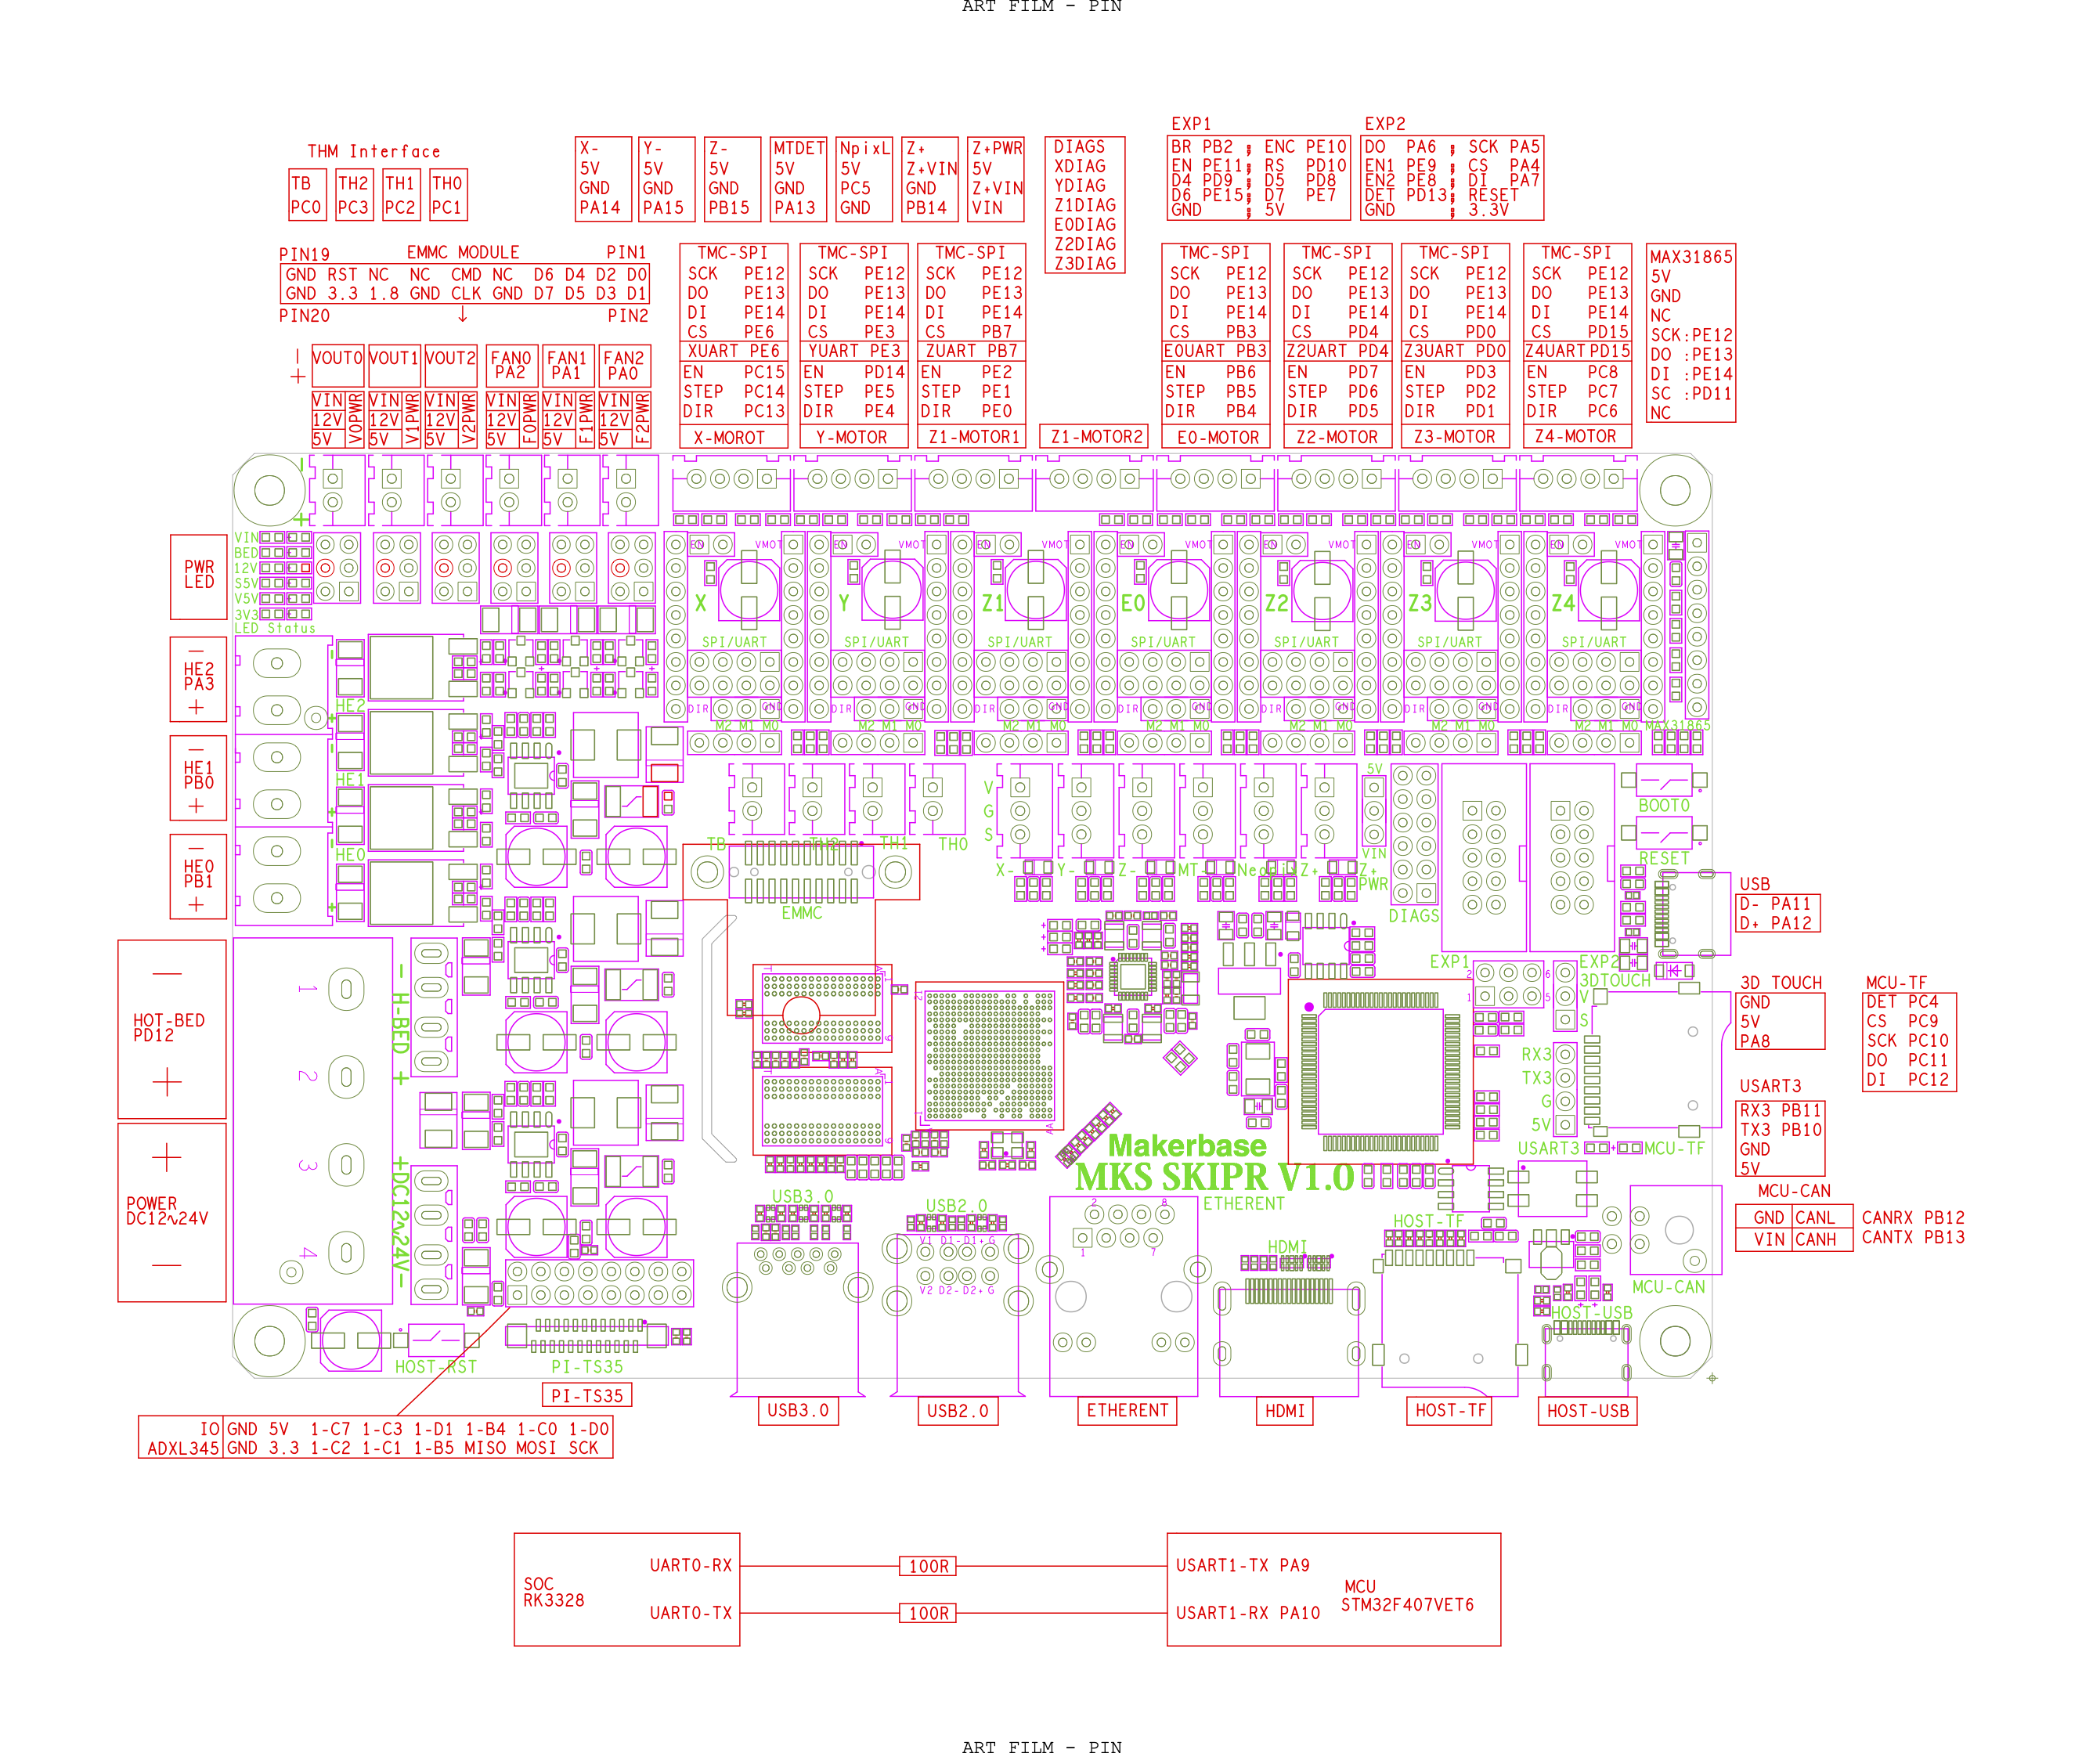
- PIN Layout (MKS)
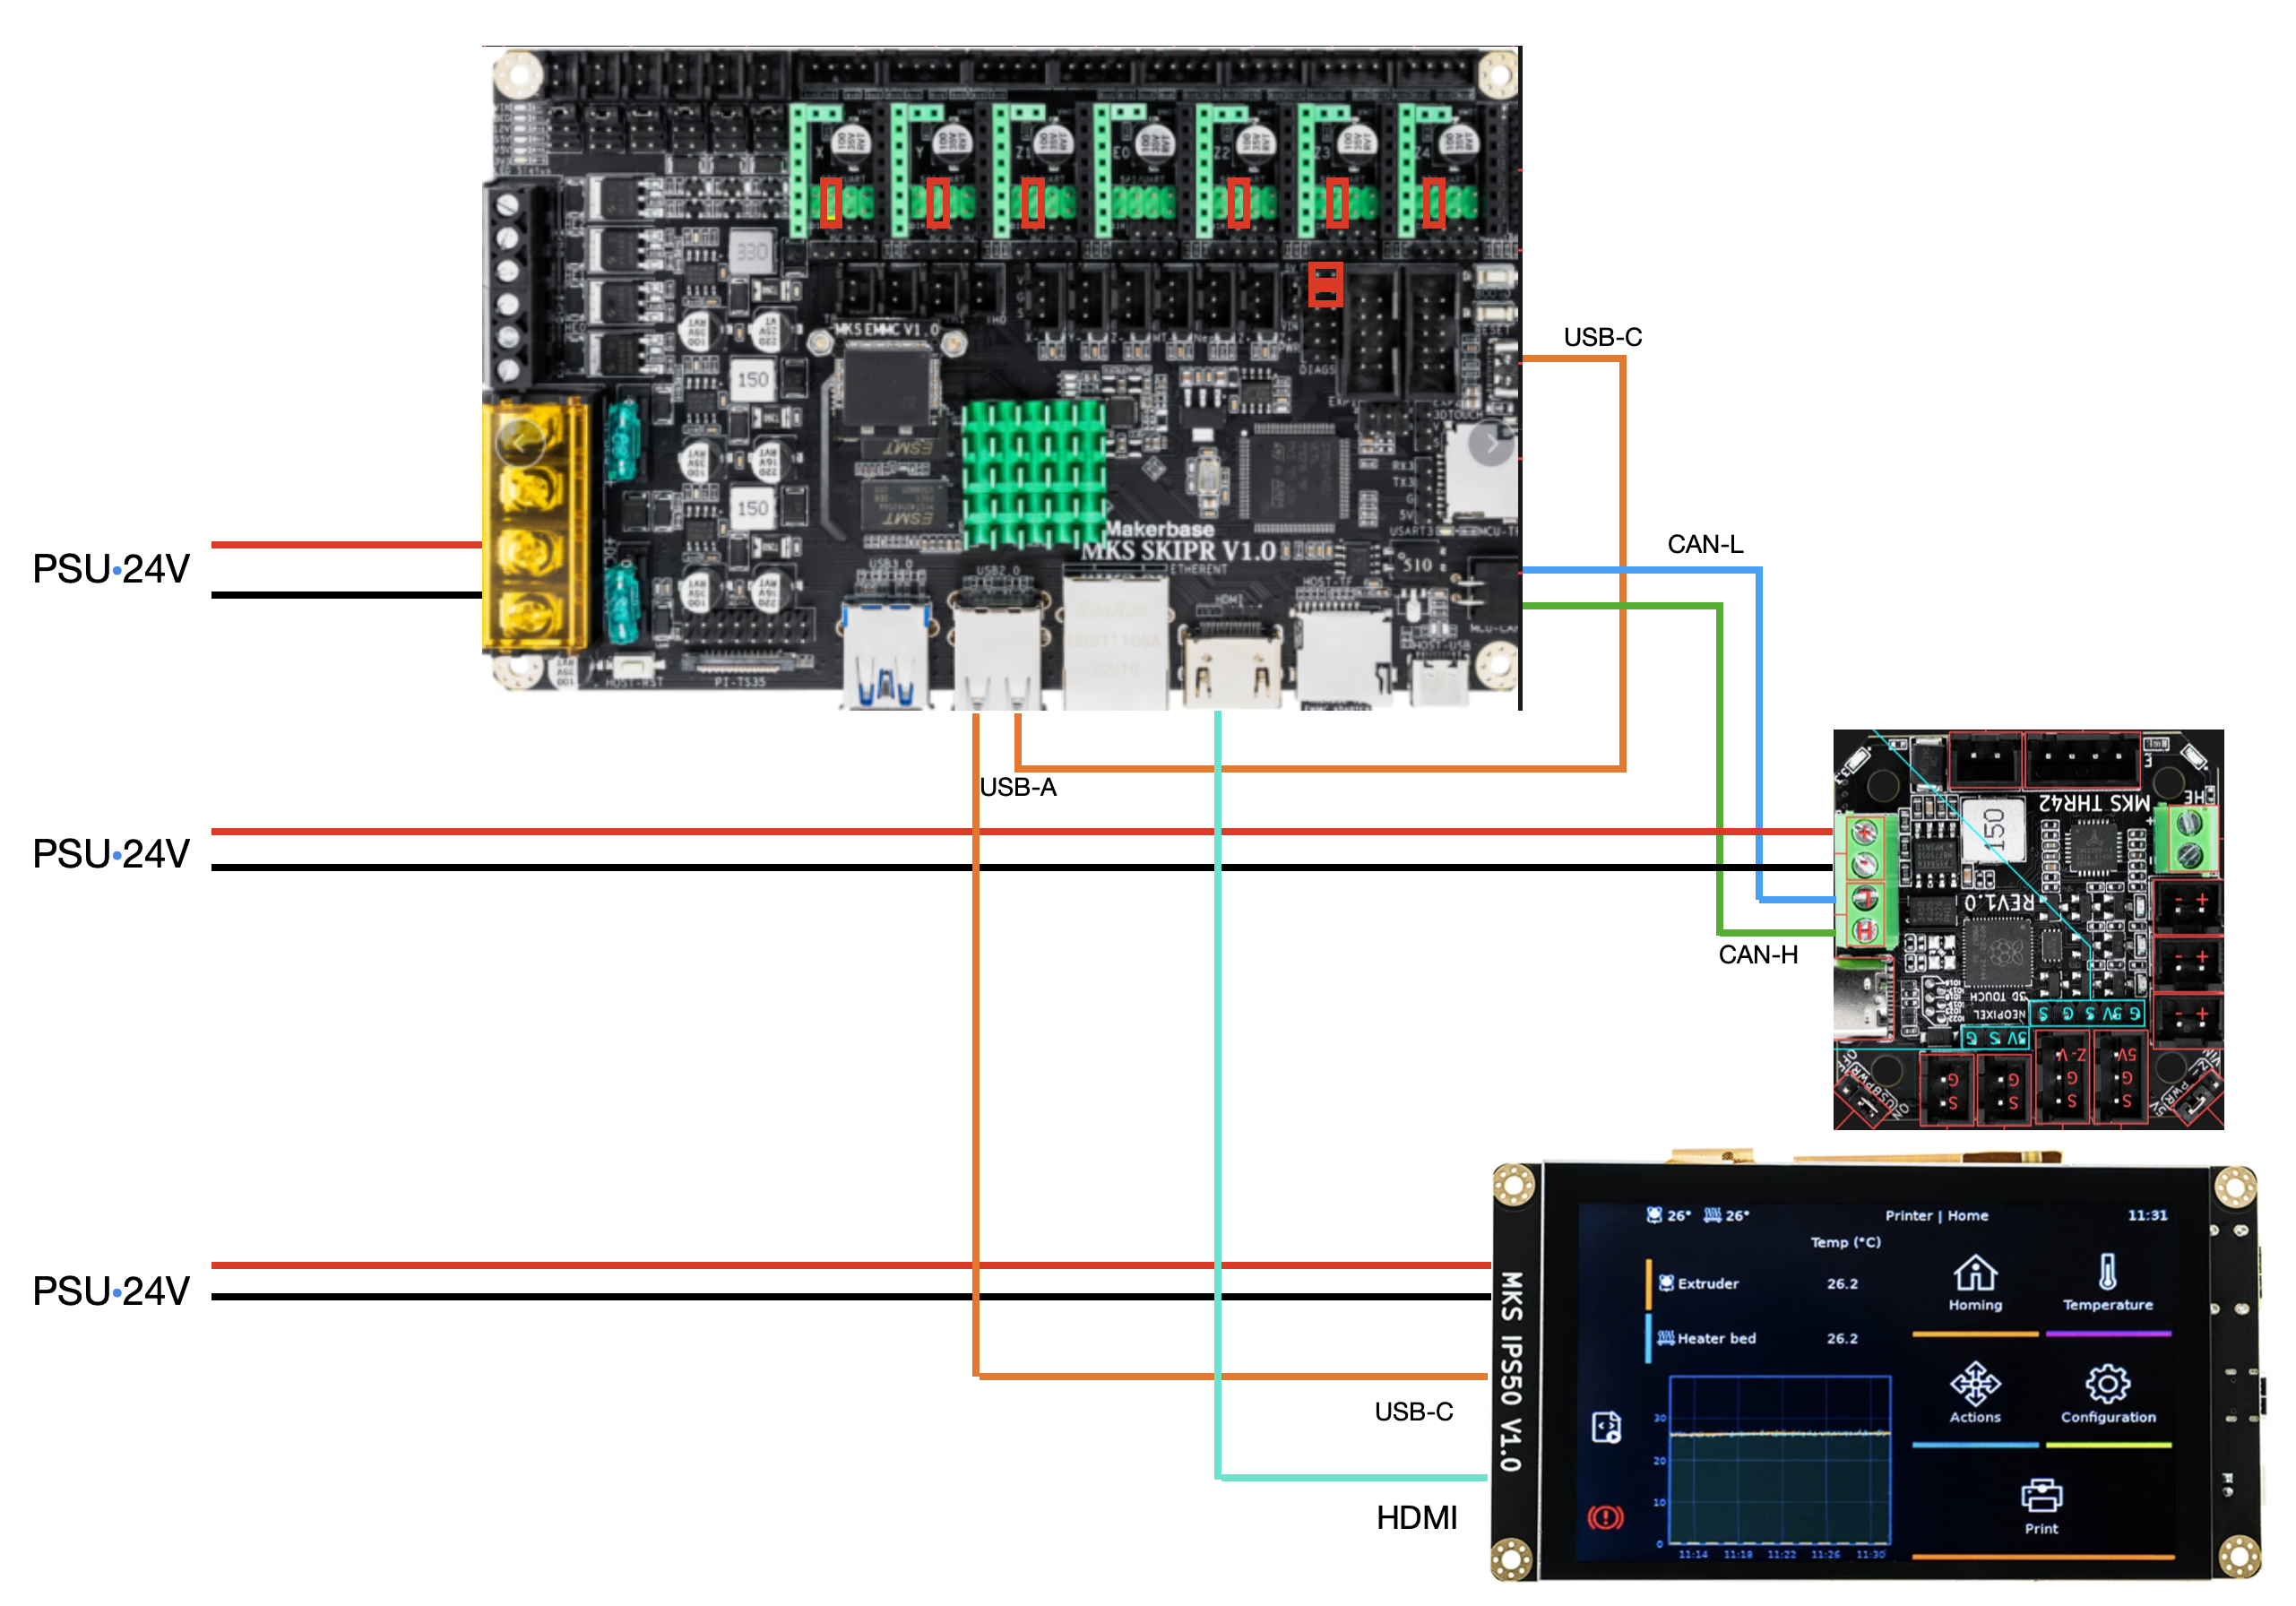
- My Cabeling and jumbers
Host Image
The Image on the EMMC does not work with HDMI.
The EMMC Modul I was not able mount on Mac / Windows. To do this an USB3 Card reader is needed.
Alternative way to flash the EMMC with the current image:
I downloaded the HDMI Image and installed on an SD Card (minimum 16 GB) via Etcher and booted the SKIPR from the SD Card.
The wget looks a bit complex but it is needed to get the file from google drive of Makerbase
Default Login : mks / makerbase
you need to replace mmcblk0 with the device name of the EMMC Module
wget --load-cookies /tmp/cookies.txt "https://docs.google.com/uc?export=download&confirm=$(wget --quiet --save-cookies /tmp/cookies.txt --keep-session-cookies --no-check-certificate 'https://docs.google.com/uc?export=download&id=17UD8ueOmiPjuQYm9PQGyeBMVGxT4GyNJ' -O- | sed -rn 's/.*confirm=([0-9A-Za-z_]+).*/\1\n/p')&id=17UD8ueOmiPjuQYm9PQGyeBMVGxT4GyNJ" -O armbian-hdmi-4.4-en-20230218.img.zip && rm -rf /tmp/cookies.txt
unzip Armbian-makerbase-k5.16.20-EN-20230321,img.zip
sudo dd if=Armbian-makerbase-k5.16.20-EN-20230321.img of=/dev/mmcblk0 bs=4M
sudo sync
sudo shutdown -h now
remove the SD card & press Host-RST Button
The SKIR boots now the new image for EMMC
Basic Setup
sudo nano /etc/sudoers
add the line to the end - this will remove the need to enter the password for sudo. Do on your on risk / security review
mks ALL=(ALL:ALL) NOPASSWD:ALL
sudo armbian-configchange the time zone to Europa/Berlin - as I'm located in germany
I did not installed all as kiauh will install missing parts automaticly.
sudo apt remove 'python3.*'
sudo apt purge 'python3.*'
sudo apt-get autoremove
sudo apt install python3 python3-numpy python3-matplotlib libatlas-base-dev
sudo update
sudo upgrade
sudo reboot
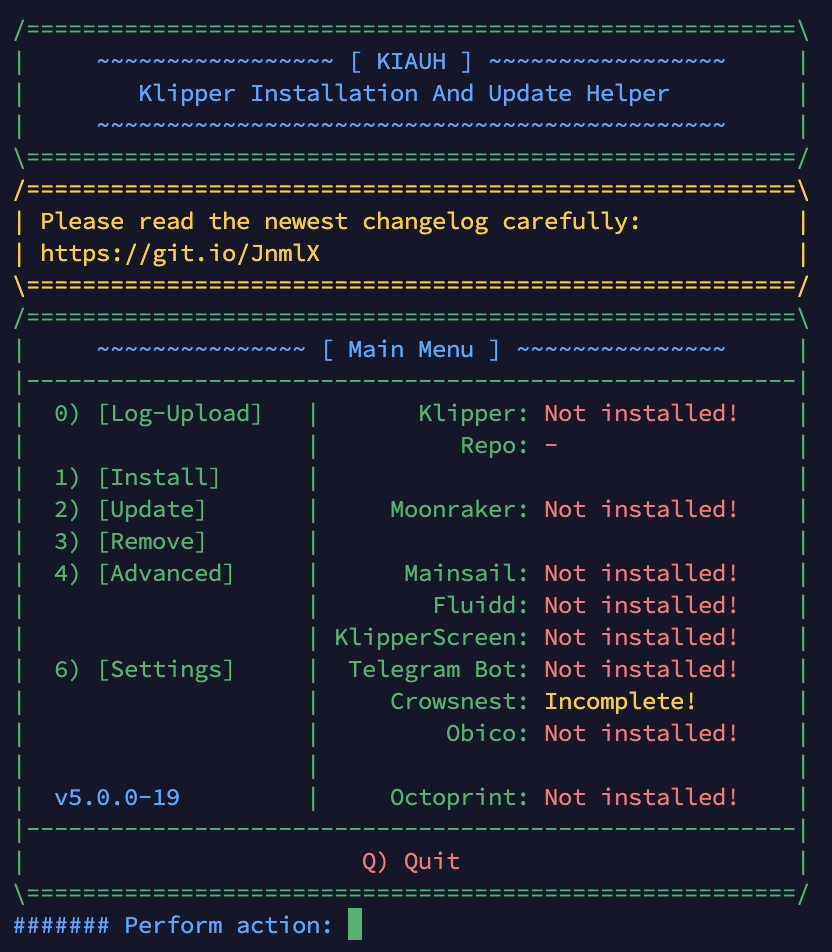
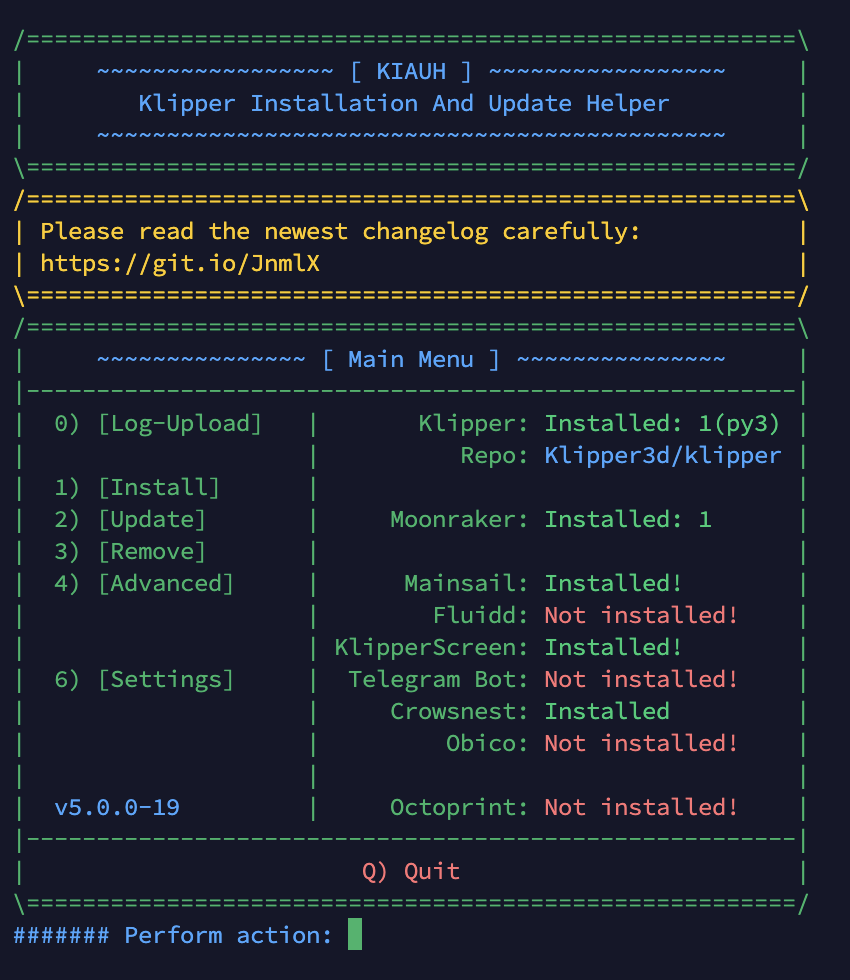
Kiauh
cd ~
./kiauh/kiauh.sh Kaiuh
First Kiauh will do a self update.
Steps after the update:
- Deinstallation of all modules / programms
- remove left overs:
sudo rm -Rf kiauh* KlipperScreen/ .kiauh.ini printer_data/ crowsnest - Install kiauh :
cd ~
git clone https://github.com/th33xitus/kiauh.git
./kiauh/kiauh.sh - Install via kiauh:
Klipper
Moonraker
Mainsail
KlipperScreen
Crowsnest - Numby Modul
~/klippy-env/bin/pip install -v numpy
~/klippy-env/bin/pip install -v extras
Setup of other Services and Configuration
cd ~/printer_data/config
rm -Rf *
git clone --branch makerbase https://github.com/TravisWilder/VoronV2_klipper_config.git .
Installation of Crownest
cd ~
git clone https://github.com/mainsail-crew/crowsnest.git
cd ~/crowsnest
sudo make install
Installation of Moonraker Timelapse
cd ~
git clone https://github.com/mainsail-crew/moonraker-timelapse.git
cd ~/moonraker-timelapse
make install
setup of my configuration for klipper (needs to be redone if you reinstall klipper)
cd ~/klipper/klippy/extras
ln -s ~/printer_data/config/scripts/ercf.py ercf.py
ln -s ~/printer_data/config/scripts/ercf_servo.py ercf_servo.py
ln -s ~/printer_data/config/scripts/ercf_encoder.py ercf_encoder.py
ln -s ~/printer_data/config/scripts/gcode_shell_command.py gcode_shell_command.py

MCU (SKIPR & THR42) Setup
Steps needed:
- create and install linux image + can interface
- create image for the SKIPR MUC
- install image on SKIPR MCU
- create image for THR42 (works for 36 as well)
- install image on the THR42
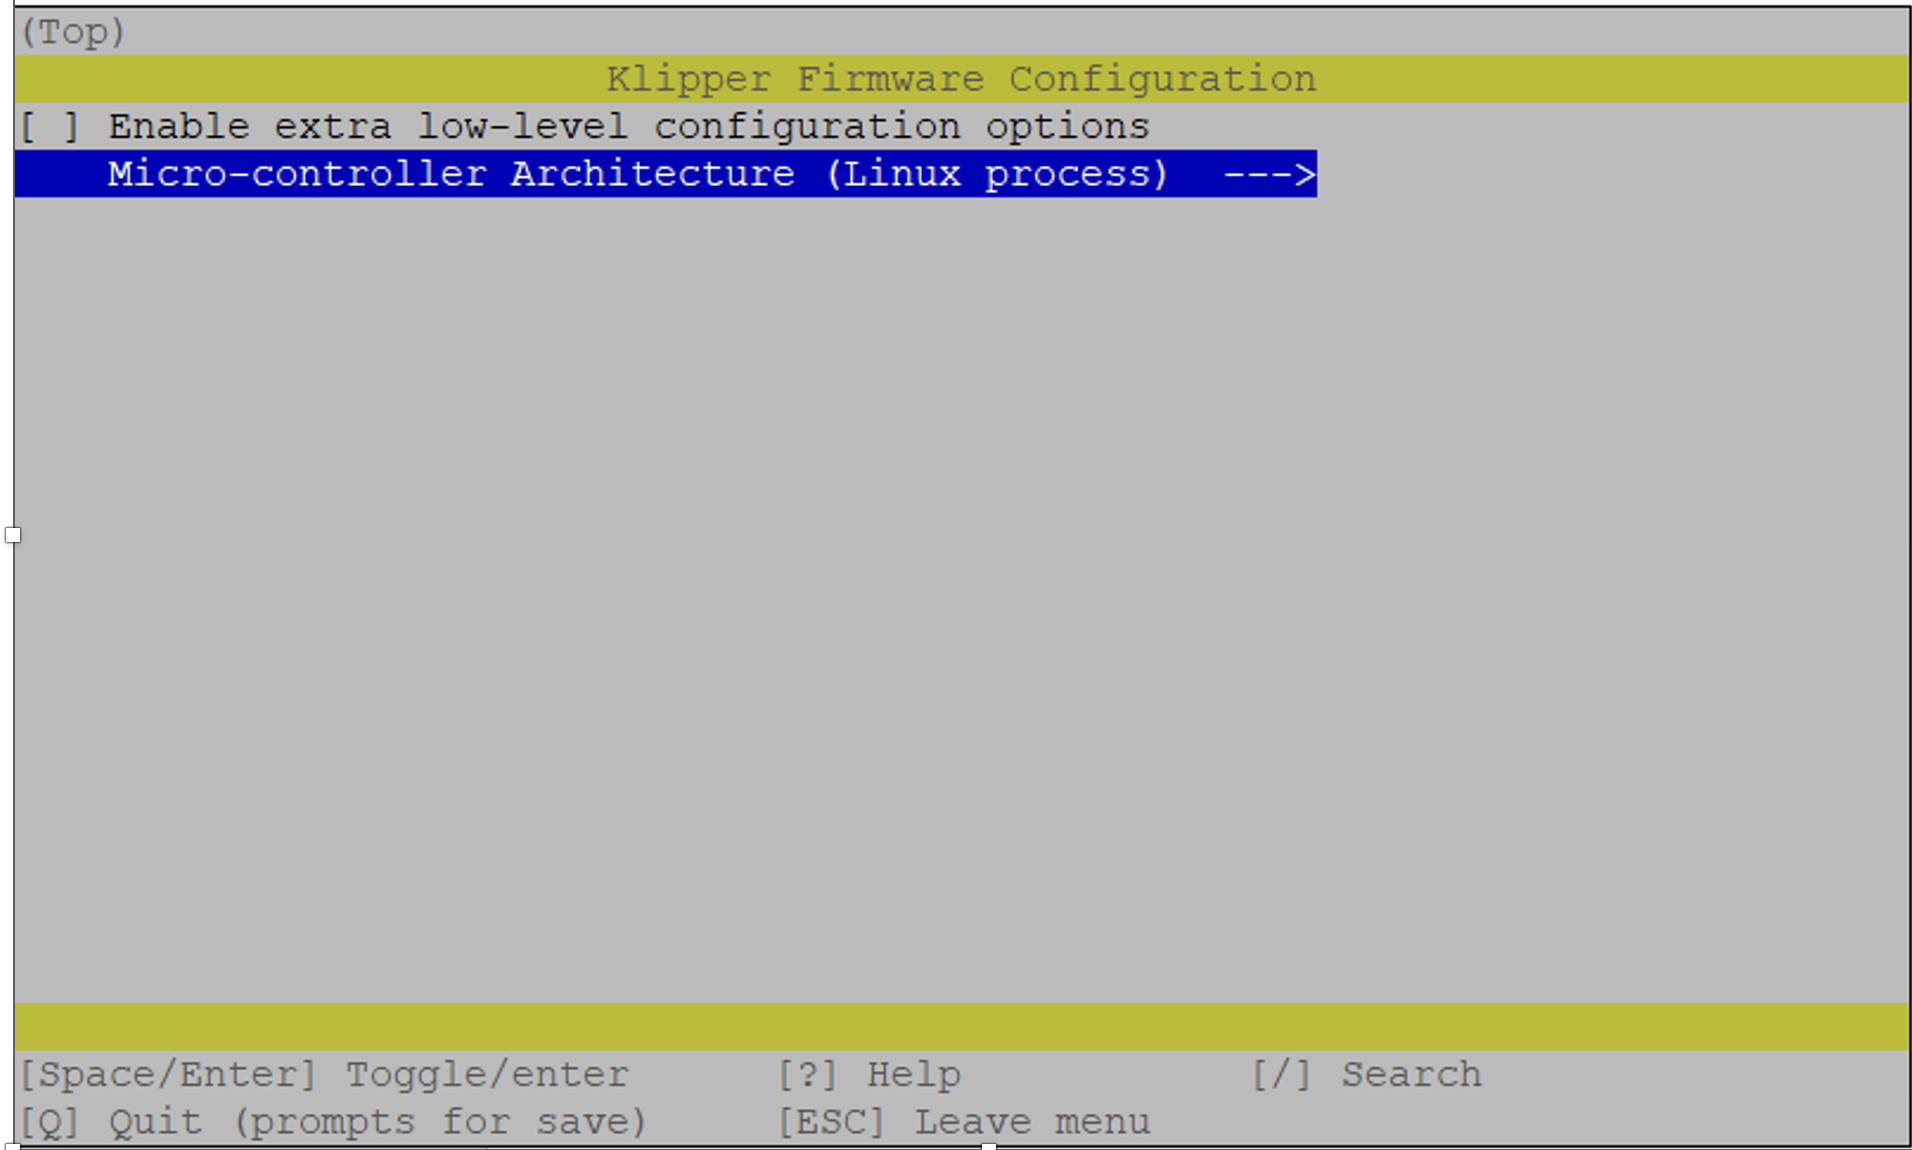
Linux MCU Image
the menuconfig setup is shown on the left
cd ~/klipper
make menuconfig
make flash
sudo cp ./scripts/klipper-mcu.service /etc/systemd/system/
sudo systemctl enable klipper-mcu.service
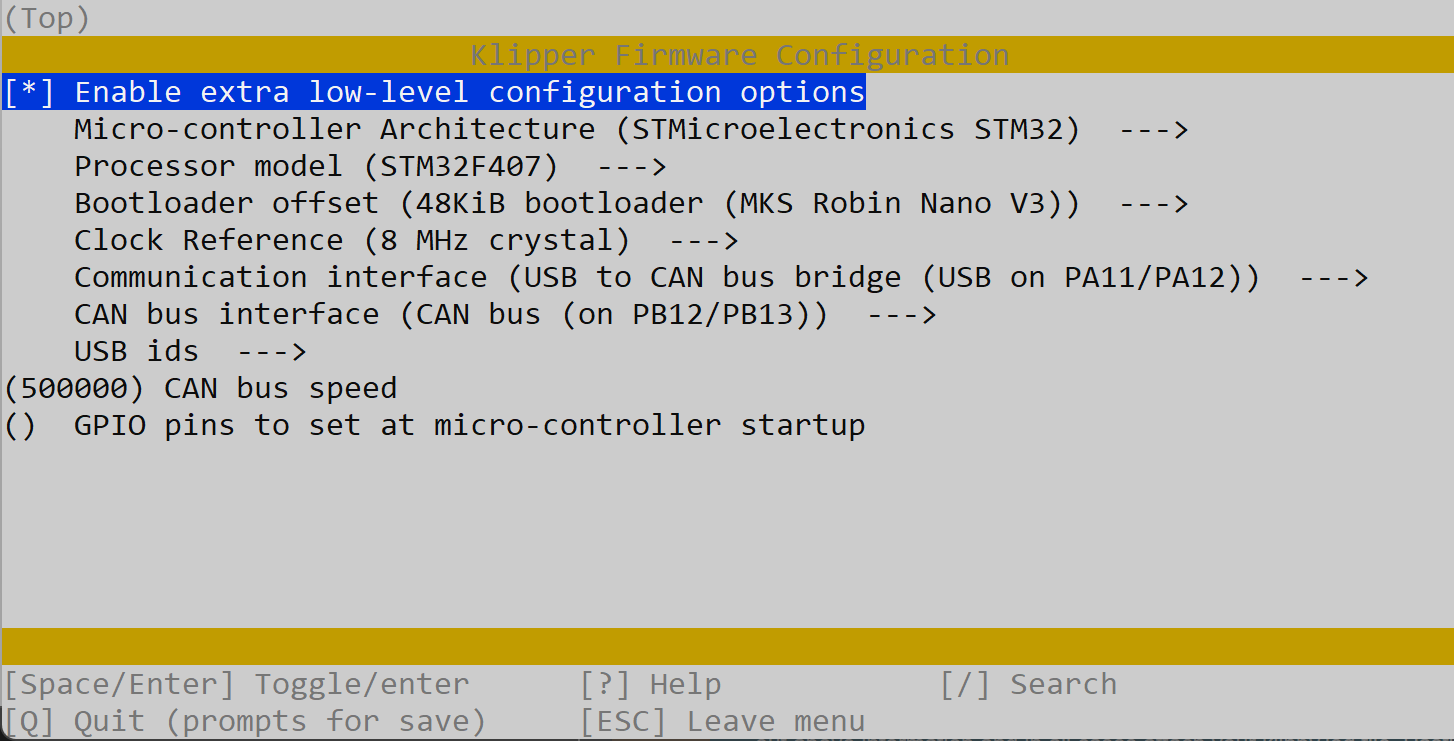
SKIPR MCU Image
the menuconfig setup is shown on the left
a small SD card is need which needs to be inserted in the Host first
cd ~/klipper
make menuconfig
make
sudo mount /dev/sda1 /mnt
cp out/klipper.bin /mnt/mks_skipr.bin
sudo umount /mnt
remove the SD Card and plug it into the mcu sdcard slot.
Reboot the MCU
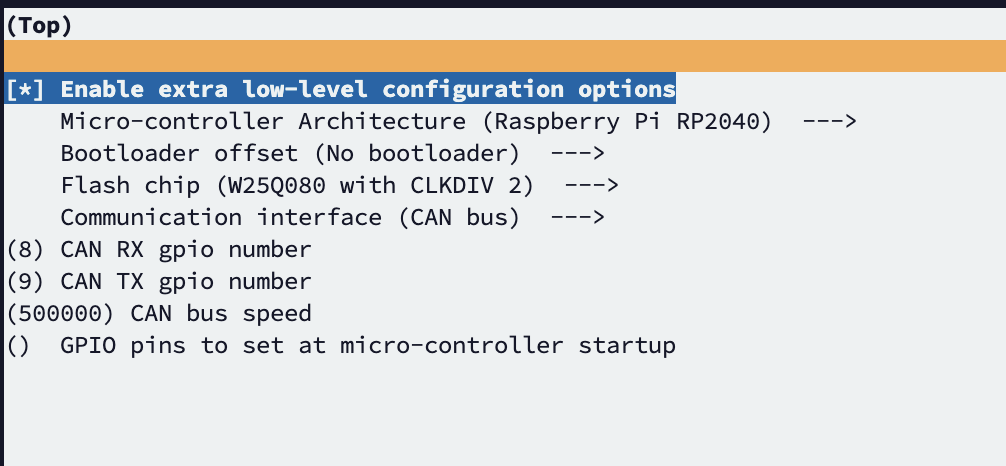
THR42 / 36 MCU Image
the menuconfig setup is shown on the left.
The THR must connected via USB cable to the SKIPR.
then press the boot + reset buttons on the THR.
With "sudo fdisk -l" you can check if the THR disk is shown to the SKIPR.
Before you umount you can check with "ls -al /mnt" if the update ist done. The klipper.uf2 is them removed by the THR
cd ~/klipper
make menuconfig
make sudo mount /dev/sda1 /mnt
cp out/klipper.uf2 /mnt/klipper.uf2
sudo umount /mnt